13 Jul 2017, 00:00

Layout of a stack frame in x86_64

Stack frame in x86_64

Just for a memo:

                         +--------------+
                         |              |
                    +    |              |
                    |    +--------------+
                    |    |              |
                    |    |   arg(N-1)   |  starts from 7'th argument for x86_64
                    |    |              |
                    |    +--------------+
                    |    |              |
                    |    |     argN     |
                    |    |              |
                    |    +--------------+
                    |    |              |
                    |    |Return address|  %rbp + 8
Stack grows down    |    |              |
                    |    +--------------+
                    |    |              |
                    |    |     %rbp     |  Frame base pointer
                    |    |              |
                    |    +--------------+
                    |    |              |
                    |    |  local var1  |  %rbp - 8
                    |    |              |
                    |    +--------------+
                    |    |              |
                    |    | local ^ar 2  | <-- %rsp
                    |    |              |
                    v    +--------------+
                         |              |
                         |              |
                         +--------------+

01 Dec 2014, 00:00

Say hello to x86_64 Assembly [part 8]

It is eight and final part of Say hello to x86_64 Assembly and here we will take a look on how to work with non-integer numbers in assembler. There are a couple of ways how to work with floating point data:

  • fpu
  • sse

First of all let’s look how floating point number stored in memory. There are three floating point data types:

  • single-precision
  • double-precision
  • double-extended precision

As Intel’s 64-ia-32-architecture-software-developer-vol-1-manual described:

The data formats for these data types correspond directly to formats specified in the IEEE Standard 754 for Binary Floating-Point Arithmetic.

Single-precision floating-point float point data presented in memory:

  • sign - 1 bit
  • exponent - 8 bits
  • mantissa - 23 bits

So for example if we have following number:

| sign  | exponent | mantissa
|-------|----------|-------------------------
| 0     | 00001111 | 110000000000000000000000

Exponent is either an 8 bit signed integer from −128 to 127 or an 8 bit unsigned integer from 0 to 255. Sign bit is zero, so we have positive number. Exponent is 00001111b or 15 in decimal. For single-precision displacement is 127, it means that we need to calculate exponent - 127 or 15 - 127 = -112. Since the normalized binary integer part of the mantissa is always equal to one, then in the mantissa is recorded only its fractional part, so mantissa or our number is 1,110000000000000000000000. Result value will be:

value = mantissa * 2^-112

Double precision number is 64 bit of memory where:

  • sign - 1 bit
  • exponent - 11 bit
  • mantissa - 52 bit

Result number we can get by:

value = (-1)^sign * (1 + mantissa / 2 ^ 52) * 2 ^ exponent - 1023)

Extended precision is 80 bit numbers where:

  • sign - 1 bit
  • exponent - 15 bit
  • mantissa - 112 bit

Read more about it - here. Let’s look at simple example.

x87 FPU

The x87 Floating-Point Unit (FPU) provides high-performance floating-point processing. It supports the floating-point, integer, and packed BCD integer data types and the floating-point processing algorithms. x87 provides following instructions set:

  • Data transfer instructions
  • Basic arithmetic instructions
  • Comparison instructions
  • Transcendental instructions
  • Load constant instructions
  • x87 FPU control instructions

Of course we will not see all instructions here provided by x87, for additional information see 64-ia-32-architecture-software-developer-vol-1-manual Chapter 8. There are a couple of data transfer instructions:

  • FDL - load floating point
  • FST - store floating point (in ST(0) register)
  • FSTP - store floating point and pop (in ST(0) register)

Arithmetic instructions:

  • FADD - add floating point
  • FIADD - add integer to floating point
  • FSUB - subtract floating point
  • FISUB - subtract integer from floating point
  • FABS - get absolute value
  • FIMUL - multiply integer and floating point
  • FIDIV - device integer and floating point

and etc… FPU has eight 10 byte registers organized in a ring stack. Top of the stack - register ST(0), other registers are ST(1), ST(2) … ST(7). We usually uses it when we are working with floating point data.

For example:

section .data
    x dw 1.0

fld dword [x]

pushes value of x to this stack. Operator can be 32bit, 64bit or 80bit. It works as usual stack, if we push another value with fld, x value will be in ST(1) and new value will be in ST(0). FPU instructions can use these registers, for example:

;;
;; adds st0 value to st3 and saves it in st0
;;
fadd st0, st3

;;
;; adds x and y and saves it in st0
;;
fld dword [x]
fld dword [y]
fadd

Let’s look on simple example. We will have circle radius and calculate circle square and print it:

extern printResult

section .data
		radius    dq  1.7
		result    dq  0

		SYS_EXIT  equ 60
		EXIT_CODE equ 0

global _start
section .text

_start:
		fld qword [radius]
		fld qword [radius]
		fmul

		fldpi
		fmul
		fstp qword [result]

		mov rax, 0
		movq xmm0, [result]
		call printResult

		mov rax, SYS_EXIT
		mov rdi, EXIT_CODE
		syscall

Let’s try to understand how it works: First of all there is data section with predefined radius data and result which we will use for storing result. After this 2 constants for calling exit system call. Next we see entry point of program - _start. There we stores radius value in st0 and st1 with fld instruction and multiply this two values with fmul instruction. After this operations we will have result of radius on radius multiplication in st0 register. Next we load The number π with fldpi instruction to the st0 register, and after it radius * radius value will be in st1 register. After this execute multiplication with fmul on st0 (pi) and st1 (value of radius * radius), result will be in st0 register. Ok, now we have circle square in st0 register and can extract it with fstp instruction to the result. Next point is to pass result to the C function and call it. Remember we call C function from assembly code in previous blog post. We need to know x86_64 calling convention. In usual way we pass function parameters through registers rdi (arg1), rsi (arg2) and etc…, but here is floating point data. There is special registers: xmm0 - xmm15 provided by sse. First of all we need to put number of xmmN register to rax register (0 for our case), and put result to xmm0 register. Now we can call C function for printing result:

#include <stdio.h>

extern int printResult(double result);

int printResult(double result) {
	printf("Circle radius is - %f\n", result);
	return 0;
}

We can build it with:

build:
	gcc  -g -c circle_fpu_87c.c -o c.o
	nasm -f elf64 circle_fpu_87.asm -o circle_fpu_87.o
	ld   -dynamic-linker /lib64/ld-linux-x86-64.so.2 -lc circle_fpu_87.o  c.o -o testFloat1

clean:
	rm -rf *.o
	rm -rf testFloat1

And run:

result

10 Oct 2014, 00:00

Say hello to x86_64 Assembly [part 7]

It is seventh part of Say hello to x86_64 Assembly and here we will look on how we can use C together with assembler.

Actually we have 3 ways to use it together:

  • Call assembly routines from C code
  • Call c routines from assembly code
  • Use inline assembly in C code

Let’s write 3 simple Hello world programs which shows us how to use assembly and C together.

Call assembly from C

First of all let’s write simple C program like this:

#include <string.h>

int main() {
	char* str = "Hello World\n";
	int len = strlen(str);
	printHelloWorld(str, len);
	return 0;
}

Here we can see C code which defines two variables: our Hello world string which we will write to stdout and length of this string. Next we call printHelloWorld assembly function with this 2 variables as parameters. As we use x86_64 Linux, we must know x86_64 linux calling convetions, so we will know how to write printHelloWorld function, how to get incoming parameters and etc… When we call function first six parameters passes through rdi, rsi, rdx, rcx, r8 and r9 general purpose registers, all another through the stack. So we can get first and second parameter from rdi and rsi registers and call write syscall and than return from function with ret instruction:

global printHelloWorld

section .text
printHelloWorld:
		;; 1 arg
		mov r10, rdi
		;; 2 arg
		mov r11, rsi
		;; call write syscall
		mov rax, 1
		mov rdi, 1
		mov rsi, r10
		mov rdx, r11
		syscall
		ret

Now we can build it with:

build:
	nasm -f elf64 -o casm.o casm.asm
	gcc casm.o casm.c -o casm

Inline assembly

The following method is to write assembly code directly in C code. There is special syntax for this. It has general view:

asm [volatile] ("assembly code" : output operand : input operand : clobbers);

As we can read in gcc documentation volatile keyword means:

The typical use of Extended asm statements is to manipulate input values to produce output values. However, your asm statements may also produce side effects. If so, you may need to use the volatile qualifier to disable certain optimizations

Each operand is described by constraint string followed by C expression in parentheses. There are a number of constraints:

  • r - Kept variable value in general purpose register
  • g - Any register, memory or immediate integer operand is allowed, except for registers that are not general registers.
  • f - Floating point register
  • m - A memory operand is allowed, with any kind of address that the machine supports in general.
  • and etc…

So our hello world will be:

#include <string.h>

int main() {
	char* str = "Hello World\n";
	long len = strlen(str);
	int ret = 0;

	__asm__("movq $1, %%rax \n\t"
		"movq $1, %%rdi \n\t"
		"movq %1, %%rsi \n\t"
		"movl %2, %%edx \n\t"
		"syscall"
		: "=g"(ret)
		: "g"(str), "g" (len));

	return 0;
}

Here we can see the same 2 variables as in previous example and inline assembly definition. First of all we put 1 to rax and rdi registers (write system call number, and stdout) as we did it in our plain assembly hello world. Next we do similar operation with rsi and rdi registers but first operands starts with % symbol instead $. It means str is the output operand referred by %1 and len second output operand referred by %2, so we put values of str and len to rsi and rdi with %n notation, where n is number of output operand. Also there is %% prefixed to the register name.

    This helps GCC to distinguish between the operands and registers. operands have a single % as prefix

We can build it with:

build:
	gcc casm.c -o casm

Call C from assembly

And the last method is to call C function from assembly code. For example we have following simple C code with one function which just prints Hello world:

#include <stdio.h>

extern int print();

int print() {
	printf("Hello World\n");
	return 0;
}

Now we can define this function as extern in our assembly code and call it with call instruction as we do it much times in previous posts:

global _start

extern print

section .text

_start:
		call print

		mov rax, 60
		mov rdi, 0
		syscall

Build it with:

build:
	gcc  -c casm.c -o c.o
	nasm -f elf64 casm.asm -o casm.o
	ld   -dynamic-linker /lib64/ld-linux-x86-64.so.2 -lc casm.o c.o -o casm

and now we can run our third hello world.

01 Oct 2014, 00:00

Say hello to x86_64 Assembly [part 6]

It is sixth part of Say hello to x86_64 Assembly and here we will look on AT&T assembler syntax. Previously we used nasm assembler in all parts, but there are some another assemblers with different syntax, fasm, yasm and others. As i wrote above we will look on gas (GNU assembler) and difference between it’s syntax and nasm. GCC uses GNU assembler, so if you see at assembler output for simple hello world:

#include <unistd.h>

int main(void) {
	write(1, "Hello World\n", 15);
	return 0;
}

You will see following output:

	.file	"test.c"
	.section	.rodata
.LC0:
	.string	"Hello World\n"
	.text
	.globl	main
	.type	main, @function
main:
.LFB0:
	.cfi_startproc
	pushq	%rbp
	.cfi_def_cfa_offset 16
	.cfi_offset 6, -16
	movq	%rsp, %rbp
	.cfi_def_cfa_register 6
	movl	$15, %edx
	movl	$.LC0, %esi
	movl	$1, %edi
	call	write
	movl	$0, %eax
	popq	%rbp
	.cfi_def_cfa 7, 8
	ret
	.cfi_endproc
.LFE0:
	.size	main, .-main
	.ident	"GCC: (Ubuntu 4.9.1-16ubuntu6) 4.9.1"
	.section	.note.GNU-stack,"",@progbits

Looks different then nasm Hello world, let’s look on some differences.

AT&T syntax

Sections

I don’t know how about you, but when I start to write assembler program, usually I’m starting from sections definition. Let’s look on simple example:

.data
    //
    // initialized data definition
    //
.text
    .global _start

_start:
    //
    // main routine
    //

You can note two little differences here:

  • Section definition starts with . symbol
  • Main routine defines with .globl instead global as we do it in nasm

Also gas uses another directives for data defintion:

.section .data
    // 1 byte
    var1: .byte 10
    // 2 byte
    var2: .word 10
    // 4 byte
    var3: .int 10
    // 8 byte
    var4: .quad 10
    // 16 byte
    var5: .octa 10

    // assembles each string (with no automatic trailing zero byte) into consecutive addresses
    str1: .asci "Hello world"
    // just like .ascii, but each string is followed by a zero byte
    str2: .asciz "Hello world"
    // Copy the characters in str to the object file
    str3: .string "Hello world"

Operands order When we write assembler program with nasm, we have following general syntax for data manipulation:

mov destination, source

With GNU assembler we have back order i.e.:

mov source, destination

For example:

;;
;; nasm syntax
;;
mov rax, rcx

//
// gas syntax
//
mov %rcx, %rax

Also you can not here that registers starts with % symbol. If you’re using direct operands, need to use $ symbol:

movb $10, %rax

Size of operands and operation syntax

Sometimes when we need to get part of memory, for example first byte of 64 register, we used following syntax:

mov ax, word [rsi]

There is another way for such operations in gas. We don’t define size in operands but in instruction:

movw (%rsi), %ax

GNU assembler has 6 postfixes for operations:

  • b - 1 byte operands
  • w - 2 bytes operands
  • l - 4 bytes operands
  • q - 8 bytes operands
  • t - 10 bytes operands
  • o - 16 bytes operands

This rule is not only mov instruction, but also for all another like addl, xorb, cmpw and etc…

Memory access

You can note that we used () brackets in previous example instead [] in nasm example. To dereference values in parentheses are used GAS: (%rax), for example:

movq -8(%rbp),%rdi
movq 8(%rbp),%rdi

Jumps

GNU assembler supports following operators for far functions call and jumps:

lcall $section, $offset

Far jump - a jump to an instruction located in a different segment than the current code segment but at the same privilege level, sometimes referred to as an intersegment jump.

Comments

GNU assembler supports 3 types of comments:

    # - single line comments
    // - single line comments
    /* */ - for multiline comments

20 Sep 2014, 00:00

Say hello to x86_64 Assembly [part 5]

It is a fifth part of Say hello to x86_64 Assembly and here we will look at macros. It will not be blog post about x86_64, mainly it will be about nasm assembler and it’s preprocessor. If you’re interesting in it read next.

Macros

NASM supports two form of macro:

  • single-line
  • multiline

All single-line macro must start from %define directive. It form is following:

%define macro_name(parameter) value

Nasm macro behaves and looks very similar as in C. For example, we can create following single-line macro:

%define argc rsp + 8
%define cliArg1 rsp + 24

and than use it in code:

;;
;; argc will be expanded to rsp + 8
;;
mov rax, [argc]
cmp rax, 3
jne .mustBe3args

Multiline macro starts with %macro nasm directive and end with %endmacro. It general form is following:

%macro number_of_parameters
    instruction
    instruction
    instruction
%endmacro

For example:

%macro bootstrap 1
          push ebp
          mov ebp,esp
%endmacro

And we can use it:

_start:
    bootstrap

For example let’s look at PRINT macro:

%macro PRINT 1
    pusha
    pushf
    jmp %%astr
%%str db %1, 0
%%strln equ $-%%str
%%astr: _syscall_write %%str, %%strln
popf
popa
%endmacro

%macro _syscall_write 2
	mov rax, 1
        mov rdi, 1
        mov rsi, %%str
        mov rdx, %%strln
        syscall
%endmacro

Let’s try to go through it macro and understand how it works: At first line we defined PRINT macro with one parameter. Than we push all general registers (with pusha instruction) and flag register with (with pushf instruction). After this we jump to %%astr label. Pay attention that all labels which defined in macro must start with %%. Now we move to __syscall_write macro with 2 parameter. Let’s look on __syscall_write implementation. You can remember that we use write system call in all previous posts for printing string to stdout. It looks like this:

;; write syscall number
mov rax, 1
;; file descriptor, standard output
mov rdi, 1
;; message address
mov rsi, msg
;; length of message
mov rdx, 14
;; call write syscall
syscall

In our __syscall_write macro we define first two instruction for putting 1 to rax (write system call number) and rdi (stdout file descriptor). Than we put %%str to rsi register (pointer to string), where %%str is local label to which is get first parameter of PRINT macro (pay attention that macro parameter access by $parameter_number) and end with 0 (every string must end with zero). And %%strlen which calculates string length. After this we call system call with syscall instruction and that’s all.

Now we can use it:

label: PRINT "Hello World!"

Useful standard macros

NASM supports following standard macros:

STRUC

We can use STRUC and ENDSTRUC for data structure defintion. For example:

struc person
   name: resb 10
   age:  resb 1
endstruc

And now we can make instance of our structure:

section .data
    p: istruc person
      at name db "name"
      at age  db 25
    iend

section .text
_start:
    mov rax, [p + person.name]

%include

We can include other assembly files and jump to there labels or call functions with %include directive.

01 Sep 2014, 00:00

Say hello to x86_64 Assembly [part 4]

Some time ago i started to write series of blog posts about assembly programming for x86_64. You can find it by asm tag. Unfortunately i was busy last time and there were not new post, so today I continue to write posts about assembly, and will try to do it every week.

Today we will look at strings and some strings operations. We still use nasm assembler, and linux x86_64.

Reverse string

Of course when we talk about assembly programming language we can’t talk about string data type, actually we’re dealing with array of bytes. Let’s try to write simple example, we will define string data and try to reverse and write result to stdout. This tasks seems pretty simple and popular when we start to learn new programming language. Let’s look on implementation.

First of all, I define initialized data. It will be placed in data section (You can read about sections in part):

section .data
		SYS_WRITE equ 1
		STD_OUT   equ 1
		SYS_EXIT  equ 60
		EXIT_CODE equ 0

		NEW_LINE db 0xa
		INPUT db "Hello world!"

Here we can see four constants:

  • SYS_WRITE - ‘write’ syscall number
  • STD_OUT - stdout file descriptor
  • SYS_EXIT - ‘exit’ syscall number
  • EXIT_CODE - exit code

syscall list you can find - here. Also there defined:

  • NEW_LINE - new line (\n) symbol
  • INPUT - our input string, which we will reverse

Next we define bss section for our buffer, where we will put reversed string:

section .bss
		OUTPUT resb 12

Ok we have some data and buffer where to put result, now we can define text section for code. Let’s start from main _start routine:

_start:
		mov rsi, INPUT
		xor rcx, rcx
		cld
		mov rdi, $ + 15
		call calculateStrLength
		xor rax, rax
		xor rdi, rdi
		jmp reverseStr

Here are some new things. Let’s see how it works: First of all we put INPUT address to si register at line 2, as we did for writing to stdout and write zeros to rcx register, it will be counter for calculating length of our string. At line 4 we can see cld operator. It resets df flag to zero. We need in it because when we will calculate length of string, we will go through symbols of this string, and if df flag will be 0, we will handle symbols of string from left to right. Next we call calculateStrLength function. I missed line 5 with mov rdi, $ + 15 instruction, i will tell about it little later. And now let’s look at calculateStrLength implementation:

calculateStrLength:
		;; check is it end of string
		cmp byte [rsi], 0
		;; if yes exit from function
		je exitFromRoutine
		;; load byte from rsi to al and inc rsi
		lodsb
		;; push symbol to stack
		push rax
		;; increase counter
		inc rcx
		;; loop again
		jmp calculateStrLength

As you can understand by it’s name, it just calculates length of INPUT string and store result in rcx register. First of all we check that rsi register doesn’t point to zero, if so this is the end of string and we can exit from function. Next is lodsb instruction. It’s simple, it just put 1 byte to al register (low part of 16 bit ax) and changes rsi pointer. As we executed cld instruction, lodsb everytime will move rsi to one byte from left to right, so we will move by string symbols. After it we push rax value to stack, now it contains symbol from our string (lodsb puts byte from si to al, al is low 8 bit of rax). Why we did push symbol to stack? You must remember how stack works, it works by principle LIFO (last input, first output). It is very good for us. We will take first symbol from si, push it to stack, than second and so on. So there will be last symbol of string at the stack top. Than we just pop symbol by symbol from stack and write to OUTPUT buffer. After it we increment our counter (rcx) and loop again to the start of routine.

Ok, we pushed all symbols from string to stack, now we can jump to exitFromRoutine return to _start there. How to do it? We have ret instruction for this. But if code will be like this:

exitFromRoutine:
		;; return to _start
		ret

It will not work. Why? It is tricky. Remember we called calculateStrLength at _start. What occurs when we call a function? First of all function’s parameters pushes to stack from right to left. After it return address pushes to stack. So function will know where to return after end of execution. But look at calculateStrLength, we pushed symbols from our string to stack and now there is no return address of stack top and function doesn’t know where to return. How to be with it. Now we must take a look to the weird instruction before call:

    mov rdi, $ + 15

First all:

  • $ - returns position in memory of string where $ defined
  • $$ - returns position in memory of current section start

So we have position of mov rdi, $ + 15, but why we add 15 here? Look, we need to know position of next line after calculateStrLength. Let’s open our file with objdump util:

objdump -D reverse

reverse:     file format elf64-x86-64

Disassembly of section .text:

00000000004000b0 <_start>:
  4000b0:	48 be 41 01 60 00 00 	movabs $0x600141,%rsi
  4000b7:	00 00 00
  4000ba:	48 31 c9             	xor    %rcx,%rcx
  4000bd:	fc                   	cld
  4000be:	48 bf cd 00 40 00 00 	movabs $0x4000cd,%rdi
  4000c5:	00 00 00
  4000c8:	e8 08 00 00 00       	callq  4000d5 <calculateStrLength>
  4000cd:	48 31 c0             	xor    %rax,%rax
  4000d0:	48 31 ff             	xor    %rdi,%rdi
  4000d3:	eb 0e                	jmp    4000e3 <reverseStr>

We can see here that line 12 (our mov rdi, $ + 15) takes 10 bytes and function call at line 16 - 5 bytes, so it takes 15 bytes. That’s why our return address will be mov rdi, $ + 15. Now we can push return address from rdi to stack and return from function:

exitFromRoutine:
		;; push return addres to stack again
		push rdi
		;; return to _start
		ret

Now we return to start. After call of the calculateStrLength we write zeros to rax and rdi and jump to reverseStr label. It’s implementation is following:

reverseStr:
		cmp rcx, 0
		je printResult
		pop rax
		mov [OUTPUT + rdi], rax
		dec rcx
		inc rdi
		jmp reverseStr

Here we check our counter which is length of string and if it is zero we wrote all symbols to buffer and can print it. After checking counter we pop from stack to rax register first symbol and write it to OUTPUT buffer. We add rdi because in other way we’ll write symbol to first byte of buffer. After this we increase rdi for moving next by OUTPUT buffer, decrease length counter and jump to the start of label.

After execution of reverseStr we have reversed string in OUTPUT buffer and can write result to stdout with new line:

printResult:
		mov rdx, rdi
		mov rax, 1
		mov rdi, 1
		mov rsi, OUTPUT
                syscall
		jmp printNewLine

printNewLine:
		mov rax, SYS_WRITE
		mov rdi, STD_OUT
		mov rsi, NEW_LINE
		mov rdx, 1
		syscall
		jmp exit

and exit from the our program:

exit:
		mov rax, SYS_EXIT
		mov rdi, EXIT_CODE
		syscall

That’s all, now we can compile our program with:

all:
	nasm -g -f elf64 -o reverse.o reverse.asm
	ld -o reverse reverse.o

clean:
	rm reverse reverse.o

and run it:

result

String operations

Of course there are many other instructions for string/bytes manipulations:

  • REP - repeat while rcx is not zero
  • MOVSB - copy a string of bytes (MOVSW, MOVSD and etc..)
  • CMPSB - byte string comparison
  • SCASB - byte string scanning
  • STOSB - write byte to string

15 Aug 2014, 00:00

Say hello to x86_64 Assembly [part 3]

The stack is special region in memory, which operates on the principle lifo (Last Input, First Output).

We have 16 general-purpose registers for temporary data storage. They are RAX, RBX, RCX, RDX, RDI, RSI, RBP, RSP and R8-R15. It’s too few for serious applications. So we can store data in the stack. Yet another usage of stack is following: When we call a function, return address copied in stack. After end of function execution, address copied in commands counter (RIP) and application continue to executes from next place after function.

For example:

global _start

section .text

_start:
		mov rax, 1
		call incRax
		cmp rax, 2
		jne exit
		;;
		;; Do something
		;;

incRax:
		inc rax
		ret

Here we can see that after application runnning, rax is equal to 1. Then we call a function incRax, which increases rax value to 1, and now rax value must be 2. After this execution continues from 8 line, where we compare rax value with 2. Also as we can read in System V AMD64 ABI, the first six function arguments passed in registers. They are:

  • rdi - first argument
  • rsi - second argument
  • rdx - third argument
  • rcx - fourth argument
  • r8 - fifth argument
  • r9 - sixth

Next arguments will be passed in stack. So if we have function like this:

int foo(int a1, int a2, int a3, int a4, int a5, int a6, int a7)
{
    return (a1 + a2 - a3 - a4 + a5 - a6) * a7;
}

Then first six arguments will be passed in registers, but 7 argument will be passed in stack.

Stack pointer

As i wroute about we have 16 general-purpose registers, and there are two interesting registers - RSP and RBP. RBP is the base pointer register. It points to the base of the current stack frame. RSP is the stack pointer, which points to the top of current stack frame.

Commands

We have two commands for work with stack:

  • push argument - increments stack pointer (RSP) and stores argument in location pointed by stack pointer
  • pop argument - copied data to argument from location pointed by stack pointer

Let’s look on one simple example:

global _start

section .text

_start:
		mov rax, 1
		mov rdx, 2
		push rax
		push rdx

		mov rax, [rsp + 8]

		;;
		;; Do something
		;;

Here we can see that we put 1 to rax register and 2 to rdx register. After it we push to stack values of these registers. Stack works as LIFO (Last In First Out). So after this stack or our application will have following structure:

stack diagram

Then we copy value from stack which has address rsp + 8. It means we get address of top of stack, add 8 to it and copy data by this address to rax. After it rax value will be 1.

Example

Let’s see one example. We will write simple program, which will get two command line arguments. Will get sum of this arguments and print result.

section .data
		SYS_WRITE equ 1
		STD_IN    equ 1
		SYS_EXIT  equ 60
		EXIT_CODE equ 0

		NEW_LINE   db 0xa
		WRONG_ARGC db "Must be two command line argument", 0xa

First of all we define .data section with some values. Here we have four constants for linux syscalls, for sys_write, sys_exit and etc… And also we have two strings: First is just new line symbol and second is error message.

Let’s look on the .text section, which consists from code of program:

section .text
        global _start

_start:
		pop rcx
		cmp rcx, 3
		jne argcError

		add rsp, 8
		pop rsi
		call str_to_int

		mov r10, rax
		pop rsi
		call str_to_int
		mov r11, rax

		add r10, r11

Let’s try to understand, what is happening here: After _start label first instruction get first value from stack and puts it to rcx register. If we run application with command line arguments, all of their will be in stack after running in following order:

    [rsp] - top of stack will contain arguments count.
    [rsp + 8] - will contain argv[0]
    [rsp + 16] - will contain argv[1]
    and so on...

So we get command line arguments count and put it to rcx. After it we compare rcx with 3. And if they are not equal we jump to argcError label which just prints error message:

argcError:
    ;; sys_write syscall
    mov     rax, 1
    ;; file descritor, standard output
	mov     rdi, 1
    ;; message address
    mov     rsi, WRONG_ARGC
    ;; length of message
    mov     rdx, 34
    ;; call write syscall
    syscall
    ;; exit from program
	jmp exit

Why we compare with 3 when we have two arguments. It’s simple. First argument is a program name, and all after it are command line arguments which we passed to program. Ok, if we passed two command line arguments we go next to 10 line. Here we shift rsp to 8 and thereby missing the first argument - the name of the program. Now rsp points to first command line argument which we passed. We get it with pop command and put it to rsi register and call function for converting it to integer. Next we read about str_to_int implementation. After our function ends to work we have integer value in rax register and we save it in r10 register. After this we do the same operation but with r11. In the end we have two integer values in r10 and r11 registers, now we can get sum of it with add command. Now we must convert result to string and print it. Let’s see how to do it:

mov rax, r10
;; number counter
xor r12, r12
;; convert to string
jmp int_to_str

Here we put sum of command line arguments to rax register, set r12 to zero and jump to int_to_str. Ok now we have base of our program. We already know how to print string and we have what to print. Let’s see at str_to_int and int_to_str implementation.

str_to_int:
            xor rax, rax
            mov rcx,  10
next:
	    cmp [rsi], byte 0
	    je return_str
	    mov bl, [rsi]
            sub bl, 48
	    mul rcx
	    add rax, rbx
	    inc rsi
	    jmp next

return_str:
	    ret

At the start of str_to_int, we set up rax to 0 and rcx to 10. Then we go to next label. As you can see in above example (first line before first call of str_to_int) we put argv[1] in rsi from stack. Now we compare first byte of rsi with 0, because every string ends with NULL symbol and if it is we return. If it is not 0 we copy it’s value to one byte bl register and substract 48 from it. Why 48? All numbers from 0 to 9 have 48 to 57 codes in asci table. So if we substract from number symbol 48 (for example from 57) we get number. Then we multiply rax on rcx (which has value - 10). After this we increment rsi for getting next byte and loop again. Algorthm is simple. For example if rsi points to ‘5’ ‘7’ ‘6’ ‘\000’ sequence, then will be following steps:

    rax = 0
    get first byte - 5 and put it to rbx
    rax * 10 --> rax = 0 * 10
    rax = rax + rbx = 0 + 5
    Get second byte - 7 and put it to rbx
    rax * 10 --> rax = 5 * 10 = 50
    rax = rax + rbx = 50 + 7 = 57
    and loop it while rsi is not \000

After str_to_int we will have number in rax. Now let’s look at int_to_str:

int_to_str:
		mov rdx, 0
		mov rbx, 10
		div rbx
		add rdx, 48
		add rdx, 0x0
		push rdx
		inc r12
		cmp rax, 0x0
		jne int_to_str
		jmp print

Here we put 0 to rdx and 10 to rbx. Than we exeute div rbx. If we look above at code before str_to_int call. We will see that rax contains integer number - sum of two command line arguments. With this instruction we devide rax value on rbx value and get reminder in rdx and whole part in rax. Next we add to rdx 48 and 0x0. After adding 48 we’ll get asci symbol of this number and all strings much be ended with 0x0. After this we save symbol to stack, increment r12 (it’s 0 at first iteration, we set it to 0 at the _start) and compare rax with 0, if it is 0 it means that we ended to convert integer to string. Algorithm step by step is following: For example we have number 23

    123 / 10. rax = 12; rdx = 3
    rdx + 48 = "3"
    push "3" to stack
    compare rax with 0 if no go again
    12 / 10. rax = 1; rdx = 2
    rdx + 48 = "2"
    push "2" to stack
    compare rax with 0, if yes we can finish function execution and we will have "2" "3" ... in stack

We implemented two useful function int_to_str and str_to_int for converting integer number to string and vice versa. Now we have sum of two integers which was converted into string and saved in the stack. We can print result:

print:
	;;;; calculate number length
	mov rax, 1
	mul r12
	mov r12, 8
	mul r12
	mov rdx, rax

	;;;; print sum
	mov rax, SYS_WRITE
	mov rdi, STD_IN
	mov rsi, rsp
	;; call sys_write
	syscall

    jmp exit

We already know how to print string with sys_write syscall, but here is one interesting part. We must to calculate length of string. If you will look on the int_to_str, you will see that we increment r12 register every iteration, so it contains amount of digits in our number. We must multiple it to 8 (because we pushed every symbol to stack) and it will be length of our string which need to print. After this we as everytime put 1 to rax (sys_write number), 1 to rdi (stdin), string length to rdx and pointer to the top of stack to rsi (start of string). And finish our program:

exit:
	mov rax, SYS_EXIT
	exit code
	mov rdi, EXIT_CODE
	syscall

That’s All.

10 Aug 2014, 00:00

Say hello to x86_64 Assembly [part 2]

Some days ago I wrote the first blog post - introduction to x64 assembly - Say hello to x64 Assembly [part 1] which to my surprise caused great interest:

newscombinator reddit

It motivates me even more to describe my way of learning. During this days I got many feedback from different people. There were many grateful words, but what is more important for me, there were many advices and adequate critics. Especially I want to say thank you words for great feedback to:

It motivates me even more to describe my way of learning. During this days I got many feedback from different people. There were many grateful words, but what is more important for me, there were many advices and adequate critics. Especially I want to say thank you words for great feedback to:

And all who took a part in discussion at Reddit and Hacker News. There were many opinions, that first part was a not very clear for absolute beginner, that’s why i decided to write more informative posts. So, let’s start with second part of Say hello to x86_64 assembly.

Terminology and Concepts

As i wrote above, I got many feedback from different people that some parts of first post are not clear, that’s why let’s start from description of some terminology that we will see in this and next parts.

Register - register is a small amount of storage inside processor. Main point of processor is data processing. Processor can get data from memory, but it is slow operation. That’s why processor has own internal restricted set of data storage which name is - register.

Little-endian - we can imagine memory as one large array. It contains bytes. Each address stores one element of the memory “array”. Each element is one byte. For example we have 4 bytes: AA 56 AB FF. In little-endian the least significant byte has the smallest address:

    0 FF
    1 AB
    2 56
    3 AA

where 0,1,2 and 3 are memory addresses.

Big-endian - big-endian stores bytes in opposite order than little-endian. So if we have AA 56 AB FF bytes sequence it will be:

    0 AA
    1 56
    2 AB
    3 FF

Syscall - is the way a user level program asks the operating system to do something for it. You can find syscall table - here.

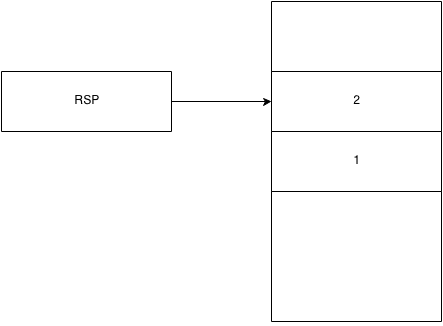
Stack - processor has a very restricted count of registers. So stack is a continuous area of ​​memory addressable special registers RSP,SS,RIP and etc. We will take a closer look on stack in next parts.

Section - every assembly program consists from sections. There are following sections:

  • data - section is used for declaring initialized data or constants
  • bss - section is used for declaring non initialized variables
  • text - section is used for code

General-purpose registers - there are 16 general-purpose registers - rax, rbx, rcx, rdx, rbp, rsp, rsi, rdi, r8, r9, r10, r11, r12, r13, r14, r15. Of course, it is not a full list of terms and concepts which related with assembly programming. If we will meet another strange and unfamiliar words in next blog posts, there will be explanation of this words.

Data Types

The fundamental data types are bytes, words, doublewords, quadwords, and double quadwords. A byte is eight bits, a word is 2 bytes, a doubleword is 4 bytes, a quadword is 8 bytes and a double quadword is 16 bytes (128 bits).

Now we will work only with integer numbers, so let’s see to it. There two types of integer: unsigned and signed. Unsigned integers are unsigned binary numbers contained in a byte, word, doubleword, and quadword. Their values range from 0 to 255 for an unsigned byte integer, from 0 to 65,535 for an unsigned word integer, from 0 to 2^32 – 1 for an unsigned doubleword integer, and from 0 to 2^64 – 1 for an unsigned quadword integer. Signed integers are signed binary numbers held as unsigned in a byte, word and etc… The sign bit is set for negative integers and cleared for positive integers and zero. Integer values range from –128 to +127 for a byte integer, from –32,768 to +32,767 for a word integer,from –2^31 to +2^31 – 1 for a doubleword integer, and from –2^63 to +2^63 – 1 for a quadword integer.

Sections

As i wrote above, every assembly program consists from sections, it can be data section, text section and bss section. Let’s look on data section.It’s main point - to declare initialized constants. For example:

section .data
    num1:   equ 100
    num2:   equ 50
    msg:    db "Sum is correct", 10

Ok, it is almost all clear here. 3 constants with name num1, num2, msg and with values 100, 50 and “Sum is correct”, 10. But what is it db, equ? Actual NASM supports a number of pseudo-instructions:

  • DB, DW, DD, DQ, DT, DO, DY and DZ - are used for declaring initialized data. For example:
;; Initialize 4 bytes 1h, 2h, 3h, 4h
db 0x01,0x02,0x03,0x04

;; Initialize word to 0x12 0x34
dw    0x1234
  • RESB, RESW, RESD, RESQ, REST, RESO, RESY and RESZ - are used for declaring non initialized variables
  • INCBIN - includes External Binary Files
  • EQU - defines constant. For example:
;; now one is 1
one equ 1
  • TIMES - Repeating Instructions or Data. (description will be in next posts)

Arithmetic operations

There is short list of arithmetic instructions:

  • ADD - integer add
  • SUB - substract
  • MUL - unsigned multiply
  • IMUL - signed multiply
  • DIV - unsigned divide
  • IDIV - signed divide
  • INC - increment
  • DEC - decrement
  • NEG - negate

Some of it we will see at practice in this post. Other will be covered in next posts.

Control flow

Usually programming languages have ability to change order of evaluation (with if statement, case statement, goto and etc…) and assembly has it too. Here we will see some of it. There is cmp instruction for performing comparison between two values. It is used along with the conditional jump instruction for decision making. For example:

;; compare rax with 50
cmp rax, 50

The cmp instruction just compares 2 values, but doesn’t affect them and doesn’t execute anything depend on result of comparison. For performing any actions after comparison there is conditional jump instructions. It can be one of it:

  • JE - if equal
  • JZ - if zero
  • JNE - if not equal
  • JNZ - if not zero
  • JG - if first operand is greater than second
  • JGE - if first operand is greater or equal to second
  • JA - the same that JG, but performs unsigned comparison
  • JAE - the same that JGE, but performs unsigned comparison

For example if we want to make something like if/else statement in C:

if (rax != 50) {
    exit();
} else {
    right();
}

will be in assembly:

;; compare rax with 50
cmp rax, 50
;; perform .exit if rax is not equal 50
jne .exit
jmp .right

There is also unconditional jump with syntax:

JMP label

For example:

_start:
    ;; ....
    ;; do something and jump to .exit label
    ;; ....
    jmp .exit

.exit:
    mov    rax, 60
    mov    rdi, 0
    syscall

Here we have can have some code which will be after _start label, and all of this code will be executed, assembly transfer control to .exit label, and code after .exit: will start to execute.

Often unconditional jump uses in loops. For example we have label and some code after it. This code executes anything, than we have condition and jump to the start of this code if condition is not successfully. Loops will be covered in next parts.

Example

Let’s see simple example. It will take two integer numbers, get sum of these numbers and compare it with predefined number. If predefined number is equal to sum, it will print something on the screen, if not - just exit. Here is the source code of our example:

section .data
    ; Define constants
    num1:   equ 100
    num2:   equ 50
    ; initialize message
    msg:    db "Sum is correct\n"

section .text

    global _start

;; entry point
_start:
    ; set num1's value to rax
    mov rax, num1
    ; set num2's value to rbx
    mov rbx, num2
    ; get sum of rax and rbx, and store it's value in rax
    add rax, rbx
    ; compare rax and 150
    cmp rax, 150
    ; go to .exit label if rax and 150 are not equal
    jne .exit
    ; go to .rightSum label if rax and 150 are equal
    jmp .rightSum

; Print message that sum is correct
.rightSum:
    ;; write syscall
    mov     rax, 1
    ;; file descritor, standard output
    mov     rdi, 1
    ;; message address
    mov     rsi, msg
    ;; length of message
    mov     rdx, 15
    ;; call write syscall
    syscall
    ; exit from program
    jmp .exit

; exit procedure
.exit:
    ; exit syscall
    mov    rax, 60
    ; exit code
    mov    rdi, 0
    ; call exit syscall
    syscall

Let’s go through the source code. First of all there is data section with two constants num1, num2 and variable msg with “Sum is correct\n” value. Now look at 14 line. There is begin of program’s entry point. We transfer num1 and num2 values to general purpose registers rax and rbx. Sum it with add instruction. After execution of add instruction, it calculates sum of values from rax and rbx and store it’s value to rax. Now we have sum of num1 and num2 in the rax register.

Ok we have num1 which is 100 and num2 which is 50. Our sum must be 150. Let’s check it with cmp instruction. After comparison rax and 150 we check result of comparison, if rax and 150 are not equal (checking it with jne) we go to .exit label, if they are equal we go to .rightSum label.

Now we have two labels: .exit and .rightSum. First is just sets 60 to rax, it is exit system call number, and 0 to rdi, it is a exit code. Second is .rightSum is pretty easy, it just prints Sum is correct.

01 Aug 2014, 00:00

Say hello to x86_64 Assembly [part 1]

Introduction

There are many developers between us. We write a tons of code every day. Sometime, it is even not a bad code :) Every of us can easily write the simplest code like this:

#include <stdio.h>

int main() {
  int x = 10;
  int y = 100;
  printf("x + y = %d", x + y);
  return 0;
}

Every of us can understand what’s this C code does. But… How this code works at low level? I think that not all of us can answer on this question, and me too. I thought that i can write code on high level programming languages like Haskell, Erlang, Go and etc…, but i absolutely don’t know how it works at low level, after compilation. So I decided to take a few deep steps down, to assembly, and to describe my learning way about this. Hope it will be interesting, not only for me. Something about 5 - 6 years ago I already used assembly for writing simple programs, it was in university and i used Turbo assembly and DOS operating system. Now I use Linux-x86-64 operating system. Yes, must be big difference between Linux 64 bit and DOS 16 bit. So let’s start.

Preparation

Before we started, we must to prepare some things like As I wrote about, I use Ubuntu (Ubuntu 14.04.1 LTS 64 bit), thus my posts will be for this operating system and architecture. Different CPU supports different set of instructions. I use Intel Core i7 870 processor, and all code will be written processor. Also i will use nasm assembly. You can install it with:

$ sudo apt-get install nasm

It’s version must be 2.0.0 or greater. I use NASM version 2.10.09 compiled on Dec 29 2013 version. And the last part, you will need in text editor where you will write you assembly code. I use Emacs with nasm-mode.el for this. It is not mandatory, of course you can use your favourite text editor. If you use Emacs as me you can download nasm-mode.el and configure your Emacs like this:

(load "~/.emacs.d/lisp/nasm.el")
(require 'nasm-mode)
(add-to-list 'auto-mode-alist '("\\.\\(asm\\|s\\)$" . nasm-mode))

That’s all we need for this moment. Other tools will be describe in next posts.

Syntax of nasm assembly

Here I will not describe full assembly syntax, we’ll mention only those parts of the syntax, which we will use in this post. Usually NASM program divided into sections. In this post we’ll meet 2 following sections:

  • data section
  • text section

The data section is used for declaring constants. This data does not change at runtime. You can declare various math or other constants and etc… The syntax for declaring data section is:

    section .data

The text section is for code. This section must begin with the declaration global _start, which tells the kernel where the program execution begins.

    section .text
    global _start
    _start:

Comments starts with the ; symbol. Every NASM source code line contains some combination of the following four fields:

[label:] instruction [operands] [; comment]

Fields which are in square brackets are optional. A basic NASM instruction consists from two parts. The first one is the name of the instruction which is to be executed, and the second are the operands of this command. For example:

    MOV COUNT, 48 ; Put value 48 in the COUNT variable

Hello world

Let’s write first program with NASM assembly. And of course it will be traditional Hello world program. Here is the code of it:

section .data
    msg db      "hello, world!"

section .text
    global _start
_start:
    mov     rax, 1
    mov     rdi, 1
    mov     rsi, msg
    mov     rdx, 13
    syscall
    mov    rax, 60
    mov    rdi, 0
    syscall

Yes, it doesn’t look like printf(“Hello world”). Let’s try to understand what is it and how it works. Take a look 1-2 lines. We defined data section and put there msg constant with Hello world value. Now we can use this constant in our code. Next is declaration text section and entry point of program. Program will start to execute from 7 line. Now starts the most interesting part. We already know what is it mov instruction, it gets 2 operands and put value of second to first. But what is it these rax, rdi and etc… As we can read in the wikipedia:

A central processing unit (CPU) is the hardware within a computer that carries out the instructions of a computer program by performing the basic arithmetical, logical, and input/output operations of the system.

Ok, CPU performs some operations, arithmetical and etc… But where can it get data for this operations? The first answer in memory. However, reading data from and storing data into memory slows down the processor, as it involves complicated processes of sending the data request across the control bus. Thus CPU has own internal memory storage locations called registers:

registers

So when we write mov rax, 1, it means to put 1 to the rax register. Now we know what is it rax, rdi, rbx and etc… But need to know when to use rax but when rsi and etc…

  • rax - temporary register; when we call a syscal, rax must contain syscall number
  • rdx - used to pass 3rd argument to functions
  • rdi - used to pass 1st argument to functions
  • rsi - pointer used to pass 2nd argument to functions

In another words we just make a call of sys_write syscall. Take a look on sys_write:

size_t sys_write(unsigned int fd, const char * buf, size_t count);

It has 3 arguments:

  • fd - file descriptor. Can be 0, 1 and 2 for standard input, standard output and standard error
  • buf - points to a character array, which can be used to store content obtained from the file pointed to by fd.
  • count - specifies the number of bytes to be written from the file into the character array

So we know that sys_write syscall takes three arguments and has number one in syscall table. Let’s look again to our hello world implementation. We put 1 to rax register, it means that we will use sys_write system call. In next line we put 1 to rdi register, it will be first argument of sys_write, 1 - standard output. Then we store pointer to msg at rsi register, it will be second buf argument for sys_write. And then we pass the last (third) parameter (length of string) to rdx, it will be third argument of sys_write. Now we have all arguments of the sys_write and we can call it with syscall function at 11 line. Ok, we printed “Hello world” string, now need to do correctly exit from program. We pass 60 to rax register, 60 is a number of exit syscall. And pass also 0 to rdi register, it will be error code, so with 0 our program must exit successfully. That’s all for “Hello world”. Quite simple :) Now let’s build our program. For example we have this code in hello.asm file. Then we need to execute following commands:

$ nasm -f elf64 -o hello.o hello.asm
$ ld -o hello hello.o

After it we will have executable hello file which we can run with ./hello and will see Hello world string in the terminal.